- Home
- Brush Plating, Technique
- Brief explanation of brush plating – what is it and how can I do it?
TECHNICAL INFORMATION
Brief explanation of brush plating – what is it and how can I do it?
What is brush plating?
“Brush plating” is a partial plating method which uses techniques of electro plating. Not like normal wet plating, brush plating does not require plating tank. In brush plating method, necessary tools are only dedicated brushes, rectifier (power supply), and chemical solutions.

What can “brush plating” do ?
Below is the list of features and usages of brush plating.
Features:
- Facility is simple.
- Easy to perform.
- In case plating sample is too big to handle, does not need to detach/disassemble the sample.
- Able to perform plating onto partial area.
- Able to be used with a variety of plating solutions.
Usages:
- To repair damaged part or worn part. For example, printing rollers.
- To improve corrosion resistance property.
- To improve abrasion resistance property.
- Decorative plating.
- Functional plating. For example, to improve resistivity, to improve wettability to solder.
The above features make it suitable for partial plating of large mechanical parts, printing rolls, shafts, etc. that cannot be contained in a plating tank or that cannot be removed, restoration of printed circuit boards, electronic parts, and other small parts, as well as for decorative items and Buddhist altar fittings.
How to perform brush plating
Preparing necessary tools
As the name indicates, “brush plating” is sometimes executed with a tool resembles to “painting brush”. However, in general industrial scenes, brush plating is being executed with a metal electrode covered with impregnating material such as absorbent cotton. These tools are expressed as brushes.
Examples of “brushes”


*IMPORTANT
In brush plating process, multiple brushes are necessary. For example, if plating processes you plan to perform are “Degreasing -> Activation -> Nickel plating”, you need 3 brushes. One is for degreasing, other one is for activation, and the last one is for nickel plating.
Examples of brush plating solutions
| Product No. | Product name | Material of brush tip | |
|---|---|---|---|
| Plating solution | BP-AU-02 | Non-cyanide Gold Plating Solution 50mL | Platinum, Carbon |
| BP-AG-03 | Non-cyanide Silver Plating Solution | ||
| BP-PT-01 | Platinum Plating Solution 100ml | ||
| BP-RH-01 | Rhodium Plating Solution 25ml | Platinum, Carbon | |
| BP-NI-01 | Nickel (acidic) Plating Solution | Carbon | |
| BP-NIW-01 | Nickel Tungsten Plating Solution | ||
| BP-CU-01 | Copper (acidic) Plating Solution | ||
| BP-CU-03 | Thick Copper (acidic) Plating Solution | Copper | |
| BP-SN-02 | Tin(acidic) Plating Solution | Tin, Carbon |
|
| BP-ZN-02 | Zinc (acidic) Plating Solution | Zinc | |
| Pre-treatment solution | BP-ELC-01 | Electrolytic Degreasing Solution | Carbon |
| BP-ACT-01 | Activated Solution (1) | ||
| BP-E-02 | Chromium Peeling Solution |
*If nothing mentioned, volume of plating solution is 500ml.
*Photos and list above are just examples, and we have other brush/solution products.
Plus, brush plating needs rectifier (power supply). For brush plating, we have rectifiers below:
- B-63 : Rectifier for Alumite / Brush Plating 10A, 0 – 20V
- B-67 : Rectifier (Model-3A2) 3A, 0 – 15V
Executing brush plating
To perform brush plating, please refer to procedure below:
1. Prepare brushes
“Painting brush” type does not need special preparation, but other brushes (brushes with metal tip) need to be covered with impregnant tip such as absorbent cotton to keep being wetted by plating solution. Please cover metal tip with absorbent cotton tightly, then wrap the covered brush tip with tube gauze. Lastly, fix them with rubber band.
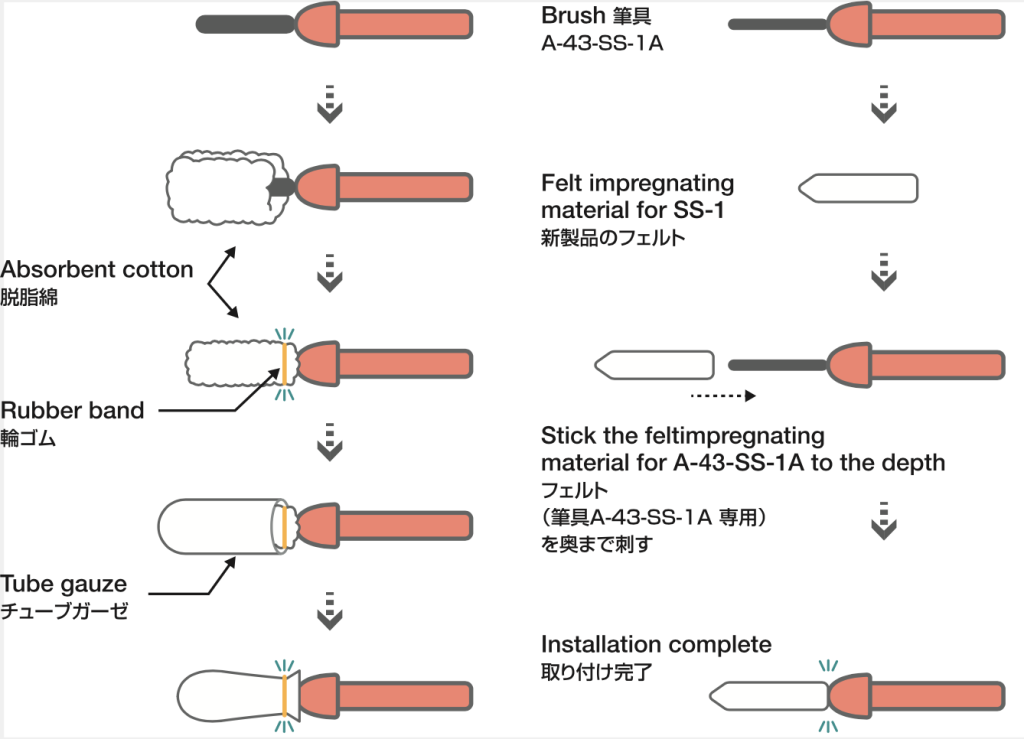
*In some cased, tube gauze is not used.
After preparation of brush tip, connect brush to rectifier’s anode side(Red/+ side), and connect plating sample to rectifier’s cathode side (Black/- side).
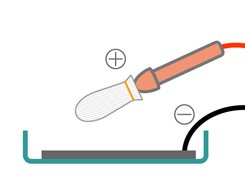
2. Pre-treatments
Perform pre-treatments. The order is:
Electro-degreasing -> rinse -> activation -> rinse
*For detail of degreasing and activation, please refer to FAQ page.
First, turn on the rectifier and adjust current value, then immerse brush tip to electro-degreasing solution, followed by putting brush tip onto plating sample. Current starts to flow and dirt on the plating sample will be removed. After degreasing is done, rinse with clean water to flush dirt. If rinsing is finished, please proceed to activation process in the same way of electro-degreasing, and rinse sample again.
* In some cases, solution can be splashed. Please prepare a tray to collect liquid.
*Rinsing process does not need electricity.
*If dirt is remaining, plating does not go well. So please perform electro-degreasing with care.
3. Plating
Same as pre-treatment, turn on the rectifier and adjust current value. Immerse covered brush tip to plating solution, then put brush tip on where you want to plate. In an instant, plating film starts to be formed. At this point, please move tip of brush slowly. If tip of brush is not in motion, it may cause burnt film.
Theory of causing plating, in other words metal is being deposited, is identical to normal electroplating. Please refer to pictures below.
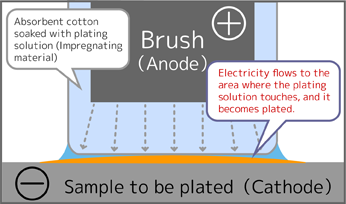
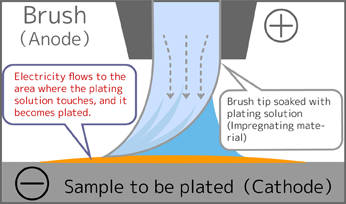
Plating condition is depend on each plating solution, so please refer to instruction manual for detailed conditions. (same as electro-degreasing and activation)
After plating is done, please rinse the plated sample well. If plating solution is remaining, it may cause corrosion and/or change of colour. After rinsing, please dry well to finish plating processes.
Performing brush plating Movie

